How to Choose the Perfect Bra: The Ultimate Fit Guide

A
Secret Desires
How many of us have spent the entire day counting down the minutes until we can finally unhook that bra and fling it across the room? We’ve all been there.  Whether it’s straps digging into your shoulders, the underwire poking you like a sharp stick, or that annoying gap in the cups, a bad bra can genuinely ruin a perfectly good mood and the outfit. The truth is, most of us are wearing the wrong size or the wrong style for our outfit. But don’t fret! Choosing the perfect bra doesn’t have to be a mystery. To choose the perfect bra, follow these 7 steps: (1) Match it to your outfit, (2) align necklines, (3) consider wear time, and (4) check fabric feel. (5) Use the “scoop and swoop” technique, (6) perform the 3-step fit test, and (7) do a final check under your clothes for a flawless silhouette! Let’s explore each of these steps in detail below.

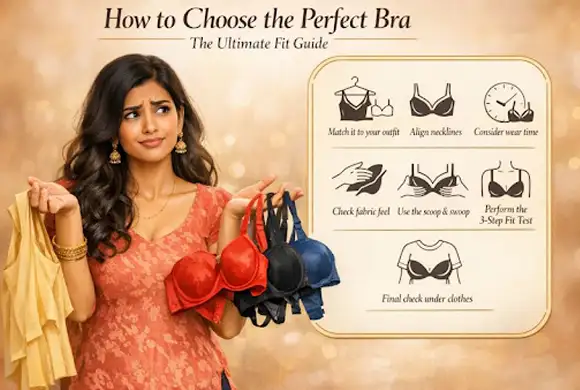
1. Choose the Bra Based on Your Outfit

We usually pick a bra and then try to make the clothes work over it. Flip that logic! The “perfect” bra depends entirely on what outfit you’re planning to wear.
    • For T-shirts: You need a seamless, moulded cup so no lines show through.
    • For Deep Necks: A plunge bra is your best friend.
    • For Indian Ethnic Wear: If you’re wearing a saree or lehenga, look for a balcony bra or a padded bra that gives a rounded silhouette without being too bulky.
    • For Kurtis and Salwar Kameez: Go for a T-shirt bra or Everyday bra for long day comfort.
  • For Halter Necks or Off-Shoulder Tops: A strapless bra with a wide silicone grip band or the multiway bra style works best.
  • For Sheer Outfits: Match your bra colour to your skin tone (nude), not the outfit colour.
You might also like: Occasion-Wise Bra Styles Every Woman Should Own

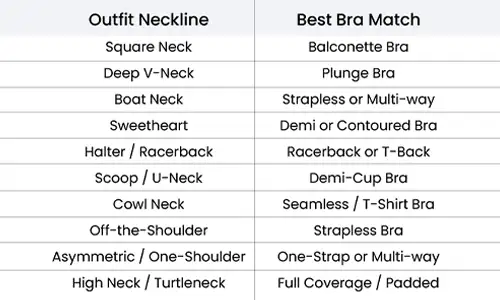
2. Match the Bra Neckline to Your Outfit

One of the most common mistakes is ignoring how the bra sits against the neckline of your top. If you’re wearing a square-neck top but your bra straps are set too close to your neck, they’ll keep peeking out. Always check if the bra’s “apex” (where the strap meets the cup) aligns with your outfit’s cut. If they don’t match, you’ll spend the whole day tugging at your clothes.

3. Choose the Bra Based on Your Plans

Are you heading to a 10-hour wedding or just popping to the shops for 30 minutes?
  • For Long Duration (Festivals & Weddings): if you’re going to be in it from the morning until the late-night dinner, avoid underwire and heavily padded bras. A longline bra with light padding can be great here as it provides extra back support.
  • Short Duration/Photoshoots: This is when you can opt for those stick-on bras or heavy padding that look amazing in pictures.

4. Touch and Feel the Bra Fabric

We often get distracted by pretty lace, but the material is what touches your skin. So, before wearing the bra, touch it and if you want you can even rub the fabric over your skin to check how it feels on your skin. 
  • Cotton: Breathable and perfect for everyday wear.
  • Spandex/Nylon blends: Great for stretch and that “invisible” look under tight clothes.
  • Lace: Beautiful, but always feel the inside lining of a lace bra.

5. Wear the Bra in the Right Way

This is the most important step. Most women just hook it and go, but there is a right way to put on a bra to ensure you’re actually supported.
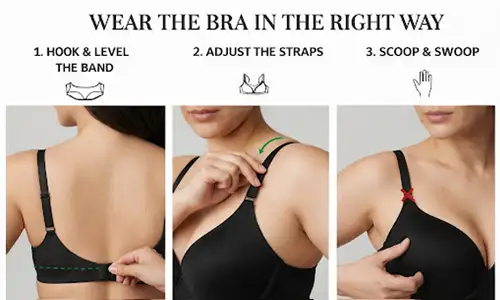
  1. Hook it on the setting where the band rests flat against your back. It should feel snug and level, not pulled up toward your neck.
  2. Adjust the bra straps so they stay securely on your shoulders. They should be firm but never digging in so hard they leave red marks or slip off. 
  3. Lean slightly forward, reach into the cup, and gently “swoop” all your breast tissue from the sides (near the armpit) into the centre of the cup. This scoop and swoop technique ensures you aren’t getting that “side-spillage” look.

6. Do the 3-Step Bra Fit Test

Once you wear a bra now is the final check for the perfect fit. Follow this 3-step fit test to make sure your bra perfectly fits you. The Two-Finger Rule: You should be able to fit two fingers under the back band comfortably. If you can fit more, the band is too loose. If you can’t fit any, it’s too tight. So, adjust it accordingly. The Jump Test: Do a little hop! If your girls bounce out of the cups or the bra shifts up your back, the fit is wrong. The Side View: Look in the mirror from the side. Your nipples should ideally sit midway between your shoulders and your elbows. If they are pointing downwards, you need more lift.

7. Check the Bra With Your Final Outfit

Now, wear the actual outfit you planned and see how the silhouette looks. Check for bra lines, weird bulges or straps peeking out. If the look is smooth and you feel the exact lift, support and comfort you need, then congratulations—you’ve chosen your bra correctly!

The Bottom Line

By taking these extra few minutes to check the fit and match your bra to your outfit, you aren’t just fixing a “look” — you’re taking care of your body and your mood for the whole day. You’ll be surprised at how different your day feels when your bra actually fits the way it should.  So, give these tips a try the next time you’re getting ready. Experience what a perfectly fitted bra truly feels like, and notice how much more confident, comfortable, and carefree your entire day becomes.

Sign Up for Our Newsletter

TRENDING POSTS


Style Guide
Top Must-Buy New Year Lingerie-Get Ready for 2020!
Style Guide
Top Must-Buy New Year Lingerie-Get Ready for 2020!
Style Guide
Top Must-Buy New Year Lingerie-Get Ready for 2020!